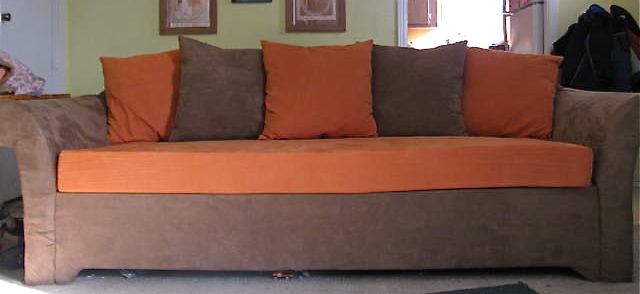
---We interrupt our previously scheduled boys posts for one ridiculously huge project done by Momma herself. Stay tuned for more boy projects are on the horizon.---
So I just finished up a very big project. However, I will admit that going into it did I think it was as big of a project that I first thought it would be. What I did was reupholstered our large, hide-a-bed couch. The actual reupholstery took a day but the pillows and cushion a bit longer as I spent an entire day reupholstering the couch. I remembered to take pictures at the start but soon discovered that
1) the lighting in my house was great but my camera isn't working right (amendment-camera is officially broken). Need. New. Camera.
2) it is way easier to take pictures when you're super excited about the project and not so much when you just want to get it done. Thus, there are a lot of early pictures and then you'll
hear read 'repeat as before.' Still I wanted to offer it up as a tutorial of sorts, though really I'm simply chronically all that I did with a few pictures to go with it.
Okay so let's get started. The Before Picture:
 |
Disgusting…I know.
Yes that is a sheet covering the cushions.
Wrong on soooo many levels. |
The After Picture:
 |
Sooooo much better.
|
Okay so what I did first was replace the cushions. I pretty sure they were original to the couch when it was new, we bought it 9.5 years ago for $25 at a yard sale and it was old then…so I'm thinking the couch is at least 25 years old if not older. Really the cushions were pathetic…you would go to sit down and what looked like 4 inches of padding turned into half an inch if you were lucky! They were in dire need of replacement.
Originally there were 3 cushions, but Husband and I were tired of that and wanted to go down to just 1 cushion…we have lots of little cars around here and it gets tiring pulling out 3 cushions and 4 pillows to find that much loved car, truck or remote control (wait how did we get on the topic of tv?). Since we wanted one cushion, that is what we got!
First I made the cover for the foam cushion. I took the measurement of my foam 67x24x5 and calculated the size. To cut down on seams I cut one piece for the the top, bottom and front seam of the cushion. Then I cut out 2 side panels, 2 panels for the zipper and a panel to make up the difference of the size of zipper and the length of the cushion (I had a 45' zipper).
So this is what I cut out:
1- 68x54 for the top, bottom, and front of the cushion
2- 45x4 for the zipper panels
2- 12x6 panels for the extension, what I should have cut was 1-24x6 panel but I will explain that later.
2- 25x6 side panels
I started by putting in the zipper.
 |
| Take your zipper and zipper panels. |
 |
Pin zipper FACE down on the RIGHT side of your fabric.
Sew zipper on. Try maintain a 1.4 inch seam allowance. |
In keeping with my goal for complete honesty this year I will say this…I am not much of a pin-er when it comes to sewing…however the key to putting in a zipper well is 1) a zipper foot (which I am currently without) and 2) pin like the dickens. Trust me, it is worth the extra time to pin then to rip out seams.
 |
Flip the zipper FACE up and fold fabric along your seam,
close to the teeth of the zipper. Stitch. |
 |
| Stand back and admire your work. Then repeat for other side. |
Okay, here is another zipper tip that I have learned. Begin sewing just below the zipper pull and finish the entire length of the zipper. Then go back, unzip your zipper and start at the top and finish up the seam. This allows you to sew close to the teeth of the zipper without the unsightly loop around the zipper pull. Very nice indeed.
After you have attached your zipper you'll want to trim the width to match the width of your extension panel.
 |
| Sew extension panel to zipper panel. Backstitch over zipper. |
 |
Iron seam.
|
Okay, now that was all I was able to accomplish during nap time and didn't get back to it until night time thus no pictures…sorry :( However, I will walk you through the next process though I'm sure you could find a nice tutorial out there as well.
You need to sew your side panels on to your large main piece…make sure you sew it to the side of the short side and not the long side. What I did was find the middle of the fabric and then the middle of the short side of the side panel (3 inches in) then I matched up the middle sections on both pieces then pinned my way back on both sides. I did this to make sure it was put in evenly in case my cutting wasn't perfect. Then pick a side and start sewing stopping .5 inch (or whatever seam allowance you like)
BEFORE the turn for your corner. Lift up your presser foot and pivot 90 degrees, now adjust your corner so that you have only 2 layers of fabric, take your time, then sew to .5 inch before next corner and repeat turning, then finish off that side. Repeat for other side panel.
Okay, so here is the last step attach the zipper panel to the back of the cushion cover. You'll want to open your zipper a bit so you have a turning hole. Line up the zipper start on one side panel then pin the entire panel to the cushion. Sew on as before for side panels, only this time it is a full circle so you will have 4 corners.
!Warning! DO NOT try and center the zipper! Please learn from my mistake, unless you want a zipper the full length of your cushion you will have to have it off centered so that when you slip on the cover you put in the foam in and then pull the zipper section over the top of the foam. If you center the zipper you'll be able to get one end in but not the other because unlike a pillow form foam doesn't squish well.
Okay, so now the actual recovering portion of the couch.
What you have to do is take the couch apart. It really isn't that hard, just physical labor and a few scratch marks on your hands. This isn't the first time I've taken it apart so it didn't take that long. I took the opportunity of having the couch torn apart to really vacuum under it…and please don't mind the overflowing laundry sorter of dirty clothes.
Next you have to take off the old fabric. I wasn't prepared for the utter deterioration of the foam under the old fabric so I had to improvise with what I had, quilt batting. I really wasn't in the mood or position to run into town for foam. I think it worked well. The above pictures are all I had of the actual steps but they are the same for all the pieces and goes like this:
Step one: Remove old fabric
Step two (optional, based on the condition of existing foam): replace foam. It really isn't that hard, and you don't need a pattern, just cut out the batting/foam a little larger than your piece. Using a staple gun staple on. Using basic sewing techniques such as notching for curves and gift wrapping practices staple batting/foam around curved areas. Make sure all areas visible when couch is put together.
Step three: Repeat step 2 with fabric.
Step four: using Scotchguard protect the fabric.
See? Not that complicated. You simply have to repeat for all the pieces. The only piece I wish I had taken more pictures of is the sides. This is because it was the only part that had sewing involved. I simply laid the piece on a wrapping paper, traced the front piece (the curved part) and then added a seam allowance and cut out of fabric. Also, because of how the couch gets put back together with bolts there is a section that is put on after the couch is put together. If you are truly wanting to recover something please email me and I can explain better.

The side of the couch where the tacks are is the portion I put on after the couch was re-assembled. What I did was staple the panel of fabric right under the curve of the side, putting right sides together so that when the fabric fell down it covered the staples. Then using a pair of needle nose pliers and a rubber mallet I hammered in the upholstery tacks down the sides. I did try a regular hammer but it damaged the finish on the tacks so go with the rubber mallet. To get the nice finish on the bottom of the side I used Velcro squares that were adhesive. I just attached the squares first the the fabric and then attached it to the underside of the couch. Obviously you could staple it but I didn't feel like lifting the couch up to do that…I lost my super strength the day I did it.
 |
| The finished couch again! |
No you can't sit on my couch now, it's way too pretty and clean...although Elsbeth already marked it with a black permanent marker. Thankfully there is the internet and Lemon juice, of all things, which along with the
Scotchguard helped to reduce the unsightliness of the stain.
Please, if you have any questions comment below or send me an email.